What you need to do before AND after upgrading to Windows 10
Microsoft has announced that a free upgrade to Windows 10 will be available on the 29th of July for�eligible systems. This can be applied anytime over the next 12 months and your computer will be presented with a system tray icon and popup showing you how. Note: Eligible computers are�those already running Windows 7 or Windows 8.1. If your computer is joined to a business �domain� network, you may still be eligible but won�t see the popup, so your IT department can control the upgrade process.
A few people have asked me if they should upgrade or not. I�m more confident about the stability of this operating system than any previous version. The end user testing (through the Windows Insider program) has been unprecedented, so a significant amount of feedback has already gone into this product�from technical people who are very particular! That doesn�t guarantee�that your upgrade will go smoothly, but all software upgrades come with a degree of risk (did your phone update to iOS8 ok? Mostly, yes. For some, no).
If you�d like to know more about the new features in Windows 10, check out: http://www.microsoft.com/en-us/windows/features?ocid=win10_auxapp_LearnMore_win10
Microsoft will tell you that the upgrade process is so easy that you can ask a 10 year old to do it: https://youtu.be/NDwL5qSCkqU
The upgrade process will:
- Check your computer to see if you have any devices, apps or compatibility issues that would mean an unsuccessful upgrade.
- Check whether your computer has enough resources to run Windows 10. Most computers running Windows 7 or Windows 8 won�t have a problem�unless you�re already running out of disk space.
- Download 3GB over your internet connection.
- Build in some protection for �rolling back� the upgrade if it fails.
But being a realistic and slightly cynical systems administrator (one who sees the pain when updates go bad), here�s what I want you to do:
1. BEFORE the upgrade, create a System Repair Disk (Windows 7)�or USB Recovery Drive (Windows 8)
Instructions for creating a Windows 7 System Repair Disc:
- Click Start, then Control Panel, then System and Maintenance, then Backup and Restore.
- �Click Create a System Repair Disc and follow the steps. You will need a blank CD.
Instructions for creating a Windows 8/8.1 System Recovery Drive: http://windows.microsoft.com/en-AU/windows-8/create-usb-recovery-drive
2. BEFORE the upgrade, lay your hands on your original software installation CDs and/or license keys for any of your critical software applications.
3. BEFORE the upgrade, confirm that you have a copy of your important files (documents, photos, saved projects etc) somewhere else other than that computer i.e. in OneDrive/Dropbox/Google Drive/external USB hard drive
And sure, if the upgrade goes painlessly, you�ve wasted a little time being super prepared. But if it turns sour, your computer repair person will thank you for your diligence (and so will your wallet when you get their reduced bill).
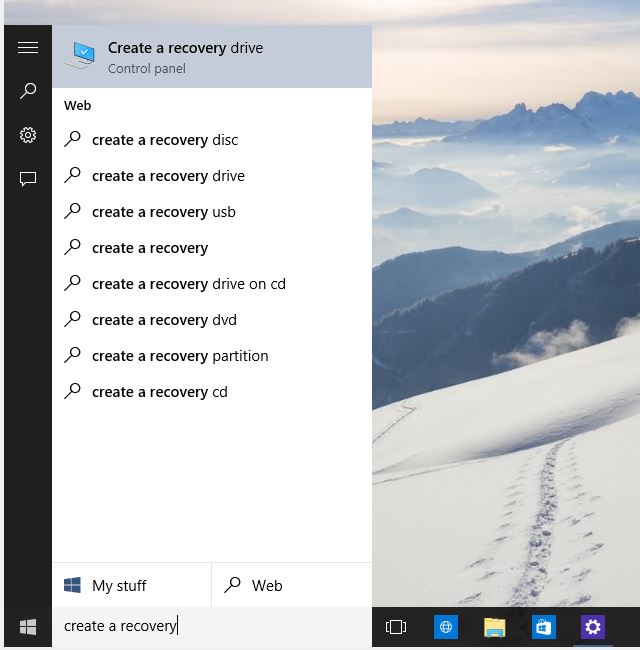
NOW THE ABSOLUTE MOST IMPORTANT THING YOU SHOULD DO�AFTER�THE UPGRADE IS �� create a Windows 10 recovery drive.
- In the �Search the web and Windows� box on the task bar, type Create a recovery then click the Create a recovery drive (Control Panel) that appears in the search results:
- Leave the tick on to Back up system files to the recovery drive. and click Next.

- Please wait will appear while the computer searches for a USB drive. You�ll need one that holds at least 4GB and it will be completely formatted, so don�t have anything else on it.
- Make sure the right drive letter for your USB drive is selected and click Next.
- Once the file copy is finished, remove & label your USB recovery drive and store it in a safe place.
A recovery drive is the best way for a computer technician to restore your computer with your settings, but it an only be created BEFORE your computer has any problems.
-SCuffy